Camera and Lighting Techniques

When controlling a camera it is important to consider the amount of light you want to enter the lens and also the method that it does so, this is referred to as exposure. There are three elements that affect the exposure: ISO, Aperture and Shutter Speed.
The ISO controls how sensitive the camera is to light, the Aperture controls the size of the hole therefore affecting how much light enters the camera at a given time and the Shutter Speed refers to the amount of time the lens is open for when capturing film.
These three variables are easily adaptable to suit the environment of which you are shooting and are incredibly fundamental to the overall quality of the image produced. For instance, if you are shooting something outside where it is over exposed it is essential to choose a very low ISO of either 200 or 100 to ensure that the image captured isn't too bright and that you capture the depth and shadow produced. This would the opposite however for shooting something inside as the lighting wouldn't be as bright therefore you may need to increase the ISO to the maximum amount to ensure that the image is exposed enough to produce a clear image.
Understanding of ISO
For this long/pan shot I used ISO 100 to ensure that the lighting wasn't over exposed and to minimise the appearance of noise that a high ISO could produce. I faced some difficulties with the exposure when the sun was more prominent as it affected the clarity of the shot, therefore this shot required numerous takes before this was achieved. To improve my shot I would adjust the focus on the lens as the image produced isn't perfectly clear therefore I need to ensure that I have a point of focus to work with before I begin shooting to be in control of this for the duration of the shot.
Pulled focus refers to a shot in which the subject of focus changes within the same shot. It is a creative camera technique often used in films to emphasise the focus of a certain subject or object within the shot. It is often used to control the viewer's attention by making other things within mise en scene appear blurry so the focus is on one subject alone. For example if there is more than one person present in the shot one of them may be in complete focus while the other person isn't, we can clearly observe details of the person's face who is in focus which helps us to form meaning from what we are viewing whereas the person who is out of person now appears unimportant. If the focus then switches within the same shot to the other person and now the roles are reversed, we see them in focus but the other person has now faded in to the background, then our attention again shifts to fit what we are being shown.
When recreating a pulled focus I had to consider aperture as this is essential to being able to successfully achieve this shot. I used a low aperture and low ISO because I was shooting outside in natural lighting and the sun was particularly overpowering on this day therefore it was more difficult to control the exposure of the shot. I started off by focusing on the tree and then moved the focus to the windows in the background of the shot. To improve this shot I would have liked to attempt this people being the subject of the shot to have more of an emphasis on the affect of the pulled focus or even playing around with different angles and types of lighting to see how this impacts the overall image.

Lighting Setups
Rembrandt
Rembrandt lighting refers to the small triangle of light that appears beneath the subjects eye and on the their cheek and is often used in mainstream media for portraits as it is thought to be one of those most flattering lighting set ups. To achieve this the subject must have their cheek facing the light source. The correct set up is as shown on the right, the subject sits directly opposite the camera and the key light must be facing the subjects cheek in order for this to be achieved. Below is an example of my attempt of Rembrandt lighting which didn't turn out as well as I would have hoped. I followed the set up as shown in the diagram but the triangle under the eye isn't as striking as it should be. Therefore, if I were to do this again I would adjust the angle of the key light to make it more of a 45 degree angle.
Butterfly Lighting

Butterfly lighting is also another flattering form of lighting favoured by the mainstream media i.e Hollywood. It creates shadows under the subjects face which should appear most notable underneath the nose so it resembles the form of a butterfly. This style of lighting is achieved by using a key light to face the directly face the subject but also adjusting the height slightly so a shadow is formed. Below is my attempt of Butterfly lighting which was unsuccessful as I did not manage to get much of a shadow beneath the subjects nose. In order to to achieve this if I was to reshoot this I would try increasing the height of the fill lightly slightly more and introducing a reflector below the edge of the frame to spread the light more.
Edge Lighting
 Edge lighting is achieved by using one light source entirely. The light is placed at a 90 degree angle to the face to illuminate one side and create a strong contrast of shadow on the other half so the face appears "split" in to two different components of light. This style of lighting is often used in film noir because the strong contrast between light and dark can be a symbol of good and bad and shadows are often used throughout film noir as it is a favoured stylistic technique of the genre. My example of edge lighting is demonstrated as below. I believe out of all the lighting set ups this is the one I was able to achieve the best results for because only one light is involved which makes the process easier and there is a definitive contrast between the half of the subject's face that is facing the light and the side that is not.
 Low Key Lighting
Low key lighting is a type of lighting which aims to create shadows and sharp contrasts. This is achieved by using "hard lights". Low key lighting is often used in film to create a certain tone or mood and can be used to isolate a subject for dramatic effect. It is often used in the horror genre because it can create a feeling of deep unease within the viewer and places emphasis on the subject alone rather than other things within the mise-en-scene. Below is an example of a set up that would be commonly used to achieve the effect of low-key lighting.

High Key Lighting
High key lighting produces an image with lighter tones, often times white and with very minimal shadows. It is used in film to create a more lighthearted and positive atmosphere and also can produce a sense of calm depending on the image. High key lighting is the opposite to low key lighting so their effects on image are equally as different. If there are multiple subjects in the frame they are often all evenly lit to achieve the full dramatic effect that high key lighting can achieve given the circumstances for its use.
Understanding of Aperture
Aperture refers to the opening of a lens. When you press the shutter on a camera it allows your camera to have a glimpse of the shot you are about to take. The aperture controls how much light will be in the shot, for instance a large aperture is created by a large opening in the lens which allows more light in to the shot and the opposite is said for a small aperture which creates a small opening in the lens therefore allowing less light in to the shot. Depth of field is also affected by aperture as it controls how much of the scene is in focus. For instance when capturing a shot of a landscape you would need to use a higher aperture of around F.22 in order to ensure that most of the image is in shot and would allow for details such as flowers or trees to be in focus which add to the overall quality of the image. Therefore the opposite can be applied to a shot where the focus is small, perhaps a small object on a table, a lower aperture would be needed to create this to distinguish the difference between the subject and the background and make it more prominent.
Demonstration of Aperture F2.8
Demonstration of Aperture F16
Understanding of Shutter Speed
Shutter speed is controlled by the shutter and it refers to the amount of time that the camera shutter is open for which control the exposure of light on to the camera sensor. To put it more simply, it's how long a camera takes to produce a photo upon the click of the shutter button. If you use a longer shutter speed your camera lens will be exposed to the image for longer meaning that it is able to capture more detail. A longer shutter speed will produce motion blur if you are capturing a moving object. This is often used in ads for cars because it communicates to the viewer the speed/motion of the car with the motion blur it produces meaning it is too fast for the camera to capture. A slow shutter speed is often used when taking photos of landscapes because the majority of the picture remains in sharp focus whilst maintaining a sense of motion of something such as a river. Photographers may choose to use a fats shutter speed when capturing an animal because it essentially allows them to freeze a second in time and doesn't produce motion blur.
Below is a diagram of what type of motion blur different shutter speed settings would produce.
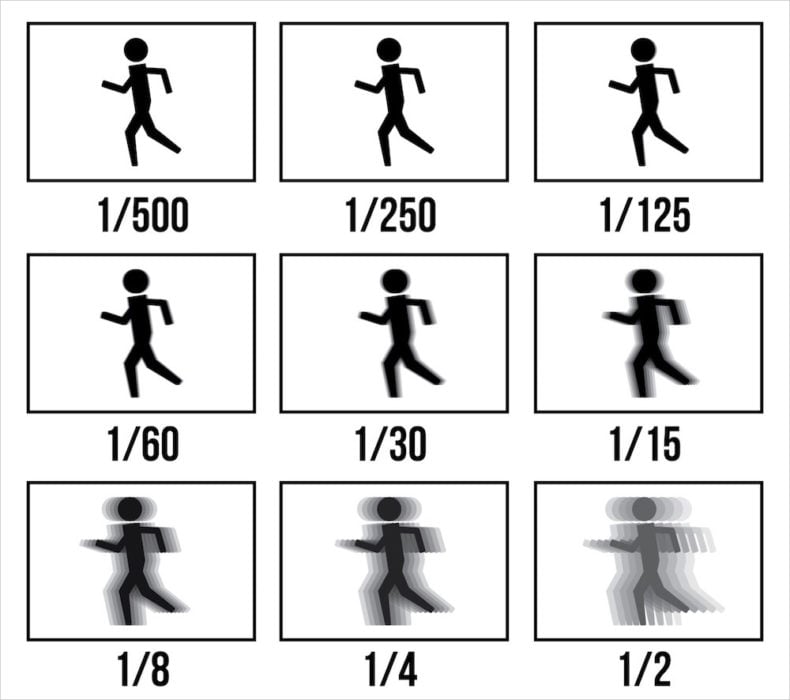
Examples of shutter speed
No comments:
Post a Comment